Category Archives: Main Dish

QUICK MEAL – My New Favorite!

I want to share with you my new favorite SUPER QUICK meal!  I have been eating this for lunch on a very regular basis lately.  This is definitely my new go-to healthy “get it all in one wrap” meal.

INGREDIENTS

1 whole grain tortilla 

1/2 cup (packed) steamed Harvest Sensations Kale

1/2-1/3 cup Eden Organics canned beans (Great Northern, Black, Chickpeas, etc)

1/4 cup sliced cherry or grape tomatoes

2 Tbs chopped basil

2-3Tbs. Sabra Chipotle Hummus

I came across this hummus a few weeks ago and thought I’d give it a try.  It is one of my new obsessions.  Word to the wise…it is SPICY, but that is why I like it.  This hummus has so many applications.  I have been using it as a sandwich spread, mixed with beans and veggies (see above), thinning it and using it as a salad dressing.  I LOVE IT!

Wraps are just such amazingly easy meals.  For this wrap simply warm the tortilla and while it is warming mix together the tomatoes (slice in half), basil, beans, and hummus.

Once the tortilla is warmed lay down the steamed kale (spinach would work great here too…I would use it raw), and pour the bean/veggie/hummus mixture on top.  Yum!

What are your favorite wrap ingredients?

6 Comments

Filed under Beans/Legumes, Main Dish, Product Reviews, Quick, Recipes, Vegan, Vegetarian

GUEST BLOG – Channa Masala by Anita Alamshaw

I am so excited about today’s guest blog.  I met Anita Alamshaw years ago through my sister-in-law.  She is such an amazing person as is the rest of her family.  Anita’s father, a Hematologist, came to the hospital to provide his expertise when my son was born and was sent to the NICU with a blood disorder (that he thankfully recovered from).  I have also called her husband (an MD) more times than I’d like to admit for medical advice.  The Alamshaw family is so giving.
I addition to being a mother and wife, Anita is Healthcare Executive and is passionate about health and cooking.  We both wish we lived closer to each other because she is in the kitchen experimenting and cooking just as much as I am.  I would love to be able to pop in for some Indian Cuisine cooking lessons.
When my sister-in-law was in town recently she went to Anita’s for a home cooked Indian meal.  She came home with a bag full of food for me to try and it was all so good.  I absolutely fell in love with Anita’s Channa Masala and asked her to share the recipe.  She has graciously agreed to allow me to share the recipe with all of you.  It is sooooo good.
INGREDIENTS
1-15oz Can of Garbanzo Beans
1 Medium Onion (chopped-small)
2 Tomatoes (chopped)
2 Cloves of Garlic (minced)
1t Whole Cumin seeds
1.5t Cumin powder
1t Coriander powder
.5t Turmeric powder
1-2t Chili powder
1-2t Salt
1T Tomato paste
1T Plain yogurt (optional)
1t Cilantro (chopped) for garnish

Rinse canned garbanzo beans with water

Heat oil in pan (medium heat) then add: whole cumin seeds, onions, garlic.  Sauté until golden brown.

Add tomatoes to mixture and sauté until it cooks and becomes a nice gravy

Add garbanzo beans along with all remaining ingredients: cumin, coriander, turmeric, chili powder, salt, tomato paste, yogurt (optional)

Mix well, low-medium heat, cover and let simmer for 15 minutes

Garnish with fresh chopped cilantro

Can be served with: Brown Rice, Tortillas, Naan / Roti / Chapati (Indian breads)

For a printable version of this recipe click here.

7 Comments

Filed under Beans/Legumes, Gluten Free, Guest Blog, Main Dish, Recipes, Vegan, Vegetables, Vegetarian

GUEST BLOG – Gluten Free Crêpes by Allyson of Manifest Vegan

Today’s Guest Blog is from Allyson Kramer of Manifest Vegan.  Manifest Vegan was named by VegNews Magazine as one of their Top 10 Picks for Veg Blogs (In their July-August 2010 issue)! 

“Manifest Vegan was created in September of 2009 to help get rid of that pesky stereotype that vegan food is un-palatable, overly digestible, and well…. limited to only tofu and salad. Although I love tofu and salad of all sorts, I aim to show you all so much more. Vegan eating is easy, and really not limiting at all.  With Manifest Vegan I want to bring inspiration into your kitchen with recipes for deliciously compassionate eats!”

A few days ago I was asked by a very sweet gal if I could make a crêpe that was, of course, both vegan and gluten free.

Here’s one variation of a crêpe recipe I have been kickin’ around for a while.  It’s a touch lighter and airier than an “eggy”, glutinous crêpe; but, it is still very delicious.

This recipe works great for both sweet and savory filled crêpes.


Gluten Free Vegan Crêpes

Ingredients:

  • 1/3 cup + 2 tbsp cornstarch
  • 1/3 cup potato starch
  • 1/3 cup sorghum flour
  • 3 tsp enerG egg replacer, dry (not mixed with any water)
  • 1/2 tsp salt
  • 1 cup non-dairy milk
  • 1/4 cup water
  • 4 tsp olive oil

Directions:

Sift together cornstarch, potato starch, sorghum flour, enerG egg replacer powder and salt.  Stir in non-dairy milk, water, and olive oil. Whisk  for about 30 seconds until thoroughly combined.

Making crêpes is very similar to making pancakes… except one thing I have always done was refrigerate the batter before using. I actually stumbled upon this technique by accident while making my first batch of vegan crêpes, about 10 years ago. Wow, time flies, eh?  I made up a gigantic amount of batter for those crêpes, and since I was cooking them only for myself, I wound up using only a bit of it. Not being wasteful, I refrigerated the rest of the batter to use the next morning for breakfast. The crêpes the next day were 100% better than the batch the day before. They cooked up nice and golden brown and more even textured (less “holey”) than the one’s I had made the day before

Since then I have discovered that many people make crêpes this way… so I guess there’s a method to that madness.

Anyways, refrigerate your batter for at least a couple of hours (preferably overnight).  Lightly spritz with cooking oil, or smear with a touch of margarine as often as needed during the crêpe making process- if you are using non-stick pan, omit this step.

Preheat the pan over medium-high heat.

Drop about 1/3 cup of batter onto the hot pan while tilting the pan to make the batter form a circle (do this off of the heat). This part is kind of hard to explain in words, but is very easy to do. Basically you are trying to create an even and thin layer of batter as quickly as possible so that the crêpe ends up thin and delicate and shaped like a circle. After all these years, I still have trouble getting them to form perfect circles every time. :\

Cook until the crêpe is lightly browned on one side and then flip. This usually takes about a minute or so. The edges will curl up nicely and you will have no problems getting a thin spatula underneath it to flip. Don’t force it though, like a pancake- they will be messy if you get impatient!

Cook the opposite side about 40 seconds to another minute, or until lightly golden brown.

Repeat until all batter is used.

Fill immediately with whatever your heart desires and wrap it all up.

Serve immediately…

I chose to saute up some shiitakes, criminis and oyster mushrooms with about 3 tsp of fresh thyme. Once the mushrooms were nice and tender I threw in about a handful of fresh baby spinach and cooked it just until it wilted. I wrapped it all up in the crêpe, and- keeping with my crazy Autumn obsession- topped it with a puree of acorn squash, miso, and a few tablespoons of almond milk. Then I topped the whole thing with some sliced almonds.

My son opted to have his filled with peanut butter, sliced bananas, strawberries, and flax seed with a touch of powdered sugar sprinkled on top. I really should have gotten a photo of that, but it was gone in an instant.

Here’s another shot of my savory crêpe:


Honestly, I could probably stick any old thing in a crêpe and still find it palatable. I kinda have an obsession with crêpes. I seriously don’t make these things nearly as often as I should.

For a printable version of this recipe click here.

5 Comments

Filed under Gluten Free, Guest Blog, Main Dish, Recipes, Vegan, Vegetarian

MACARONI and CHEESE – Vegan, Dairy, and Gluten Free

My kids LOVE macaroni and cheese.  When my family became dairy free and my daughter became gluten free on top of that, I knew I needed to come-up with a yummy dairy and gluten free version.  Thank goodness for Daiya brand cheese!  It melts so well and provides my mac and cheese with such a great flavor.  This recipe is also made that much better by the fact that So Delicious makes an amazing unsweetened coconut milk that totally replaces the “regular” milk in this recipe (and any other recipe).  I can’t give So Delicious enough praise…their products are truly amazing!!!

I know this is a good mac and cheese recipe because the neighborhood boys (neither dairy OR gluten free) completely devour it whenever I make it.

One word of caution…Daiya is high in fat (at least it is not the animal-based kind!), but not nearly as high in fat as dairy based cheese.  This is definitely a “treat” meal in my house.  I recently spent some time up in Northern California because my dad had a DOUBLE knee replacement (he is such a rock star!).  My kids were troopers while I was gone, so I promised I would make them this mac and cheese recipe when I came home.  I think they thought it was a very fair trade-off for having mom gone for so long.

INGREDIENTS
16oz package of elbow macaroni (I used Quinoa)
2 pkgs shredded Daiya Cheese (I use one pkg cheddar and one mozzarella)
2 1/2 cups Unsweetened So Delicious Coconut Milk
1/4 teaspoon black pepper
Salt to taste ( approx.1-1 ½ tsp)
1. Preheat oven to 350 degrees.
2. Cook pasta about 5 minutes until it’s just tender. Don’t cook all the way or it will fall apart when you bake it.
3. Drain pasta and transfer to glass baking dish.
4. Bring the Unsweetened So Delicious Coconut Milk to a low boil.


5. Add the Daiya cheeses, pepper, and salt to the warmed milk.  Allow everything to melt (stir constantly so it does not burn).

6. Pour the melted milk/cheese mixture into the pasta and mix well.

7. Put in the oven for 30-35 minutes or until the cheese is bubbling.

For a printable version of this recipe click here.

38 Comments

Filed under Gluten Free, Main Dish, Vegan, Vegetarian

FRESH MEX CORN SALAD

I am so happy that Spring is here!  Although it isn’t quite April yet, we definitely are experiencing the “showers” part.  Now that Spring has arrived, the amazing produce Spring brings has started making its way into farmer’s markets and the grocery stores…yay! 

While I do cook this salad slightly, it would be very good completely raw as well.

INGREDIENTS

6 cups freshly cut corn (I used 8 small ears)

1 red bell pepper, diced

1 orange bell pepper, diced

1 onion, diced

½ head cilantro, chopped

1 ½ cups jicama, diced

1 lime

1 tsp olive oil

½-1 tsp ground cumin

salt to taste

pepper to taste

 ~

Pour the tsp of olive oil into a pan.  Over medium heat lightly sauté the onions and peppers for 2 minutes (you want to maintain their crunch).  Add the corn and sauté for an additional 2 minutes.

Squeeze in the juice of the lime and turn off the heat.  Salt and pepper the mixture to taste.  Sprinkle in the cumin and mix well.  Add the cilantro and jicama and mix thoroughly.

Let the freshness of the ingredients speak for itself.  Do not overpower the salad by adding too many spices.

This salad tastes phenomenal accompanied by flavorful black beans…I ate this for lunch three days in a row!

For a printable version of this recipe click here.

5 Comments

Filed under Gluten Free, Main Dish, Recipes, Salad, Sides, Vegan, Vegetables, Vegetarian

CROCK POT VEGETARIAN CHILI – Guest Blog By Catherine of Weelicious

Today we have another guest post from Catherine McCord of Weelicious!  We all loved her first Guest Blog for Veggie Grettie where she made Crock Pot Black Bean Soup and I know you will also love her Crock Pot Vegetarian Chili.  I personally always need to have a good arsenal of quick and easy recipes…life gets busy!  Enjoy.

~

In my quest for new and interesting flavors for Kenya, I focus in on one flavor and obsess about how I can introduce it to him in order for him to love it, but not be overwhelmed by it. At the same time, I’m always trying to create a dish the whole family can eat (plus leftovers for a few days). This week, chili powder was my focus.
It’s hot, smokey, a little spicey and delicious. Most people wouldn’t dream of a 10 month old liking something so intense, but I feel like babies palates are ready for anything as long as it’s not over powering.
There are 2 tablespoons of chili powder in the recipe which sounds like a lot, but the recipe also serves 16 people! When I say I like leftovers, I mean it. When the chili is finished, I put 2 cups in a Cuisinart and whiz it up for Kenya to have over the next few days. It’s packed with all the things he needs in his diet.

Vegetarian Chili (Serves 16)

1 16 Oz Cans Organic Chopped Tomatoes
2 32 oz Boxes Vegetable Broth
6 Cups Raw Mixed Beans (Lentils, Yellow Split Peas, White Beans) (If using large beans, soak the night before)
2 Tbsp Olive Oil
1 Onion, minced
5 Cloves Garlic, minced
6 Celery Stalks, chopped
6 Carrots, chopped
1 Bell Pepper, chopped
2 Tbsp Chili Powder
1 1/2 Tbsp Cumin
2 Tsp Salt
1 Tsp Sweet Paprika
1 Large Bunch Dinosaur Kale, chopped

1. Place the first 3 ingredients in the Crock Pot.
2. Heat olive oil over medium flame and saute onions for 5 minutes. Lower heat if they start to brown. Add garlic and continue to saute another 2 minutes. Pour the onion mixture into the crock pot with the remaining ingredients and stir to combine.
3. Cook on high for 12 hours.
4. Serve.

**Allow to cool, place in appropriate container or Ziploc bag, label and freeze up to 4 months. When ready, defrost in fridge for 24 hours or place in pot and heat through under low-medium heat.

For a printable version of this recipe click here.

For more Weelicious recipes click here.

Photo courtesy of Weelicious.com

6 Comments

Filed under Beans/Legumes, Crock Pot, Gluten Free, Guest Blog, Main Dish, Recipes, Soup, Vegan, Vegetarian

MUSHROOM ROSEMARY DINNER PANCAKES

I was inspired to make these dinner pancakes while reading through Madhur Jaffrey’s World Vegetarian.  Using chickpea / garbanzo bean flour as a base for the pancake is a great way to incorporate more protein into a meal.  These pancakes were light, yet satisfying.  I served my pancakes with lightly dressed steamed kale (click here to see my latest kale post)

INGREDIENTS

PANCAKE
1 cup garbanzo bean flour
½ tsp Himalayan salt
1 cup water (or liquid from the reconstituted mushrooms)
3 Tbs. olive oil
.
TOPPING
2 heads roasted garlic
½ cup dried mushroom mix, chopped once reconstituted
½ large onion, sliced into moons and caramelized
1-2 tsp oil
½ tsp fresh rosemary, chopped
½ tsp. Himalayan salt
pepper to taste

 ~

Set the oven to broil.

Pour hot water over the mushrooms to reconstitute.  I bought my mix at Costco (by a company called Shiitake-Ya).

Place the garbanzo bean flour and salt ina a mixing bowl.  Use a whisk and incorporate well.  Combine well with the water (or 1 cup of cooled liquid from the reconstituted mushrooms) and olive oil.  Once mixed well, set aside for 30 minutes.

Place the onion and 2 tsp. of oil in a sauté pan and caramelize.

Mix together the roasted garlic, chopped mushrooms, salt, pepper, and ½ tsp chopped fresh rosemary.

Pour 1/3 cup of pancake batter into a lightly greased pan (spread out the batter).  While the pancake begins to cook, top it with some of the topping mixture.  Once the pancake has browned, set it aside until all of the pancakes are browned and ready to go into the oven.

Once all of the pancakes have been browned, place them directly on the oven rack (not on a cookie sheet) under the broiler for 8-10 minutes (you may need to rotate them after 4-5 minutes).  Broiling the pancakes will make sure that the batter on the top cooks through.

Serve with a nice salad or some steamed veggies on the side.

For a printable version of this recipe click here.

14 Comments

Filed under Breads / Crackers / Muffins, Gluten Free, Main Dish, Recipes, Vegan, Vegetarian

KALE BURGER – Guest Post by Karon Hampton of Brooklyn Eats

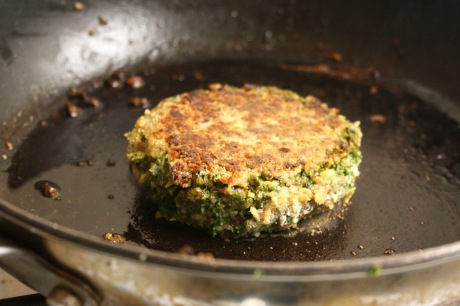
Kale Burger by Brooklyn Eats

Today we have a guest post from Karon Hampton of Brooklyn Eats.  Karon started this blog as a platform for sharing the  menu making she does on (a modest budget) with her family and friends.  She can sometime be found sharing the rest of her life through the blog as well.  Enjoy the awesome kale burger…

~

I just want to be clear about what we are talking about here – a burger made of kale. Not ground meat mixed with kale. Not a portobello mushroom topped with kale. Not even a black bean, potato and kale patty – no, this is simply kale in burger form. I couldn’t find the frickin recipe anywhere online so I gave up and made up my own – and a few versions later, it worked!

The idea, like so many of our food ideas, came from a great local restaurant here in Brooklyn. We treated ourselves to iCi for brunch and A got the kale burger with caramelized onions on a kaiser bun (ok, ok, and goat cheese but it was just a teeny bit!). We were blown away not only by the taste and texture but by the fact it was pretty much just kale – no visible beans or potatoes or anything besides the light, crunchy breading on the outside. They served it with pickled rhubarb and fried artichokes and altogether it was the stuff dreams are made of.

Back home, Google searching turned up all of the afore-mentioned recipes but nothing quite like the iCi burger. So we improvised and came up with a really delicious kale burger that is just as good as iCi’s (if I may be so modest). The exact same? No. But I look forward to continued testing and tweaking!

inspired by the wonderful iCi in Fort Greene (check it out if you’re in the area!)

INGREDIENTS

1 large bunch kale, well-washed and mostly dried

sea salt

1 large tomato, chopped

1 tablespoon almond butter or tahini

1/2 teaspoon garlic or 1 clove garlic

1/2 teaspoon coriander

cayenne to taste (if you like)

heaping 1/4 cup almond meal

heaping 1/4 cup flour

olive oil

[1] Remove stems and chop kale into very thin ribbons; sprinkle with sea salt and gently massage; let rest 15 minutes. The kale will turn a bright green and soften. Meanwhile in a food processor or blender combine the tomato, tahini or almond butter, garlic and coriander. If your tomato is not super juicy, add a tablespoon or two of water.

[2] In a large saucepan heat a little oil. Add the kale and sauté for a minute; then add 1/2 cup or so of water and cover loosely. Let cook 5 to 8 minutes (the fresher the kale the shorter the cook time) until it’s just wilting but not totally limp. Transfer kale (leave behind any remaining water in the pan) to large bowl. Meanwhile mix the almond meal and flour in a small bowl. If desired, you could add a little cayenne to this mix too.

[3] After it cools enough to handle, add 2/3 of the kale to the blender with the tomato mixture and blend. You don’t want it to get too smooth; maybe pulse on and off for a minute or two. Transfer this blended mix back into the large bowl with the reserved kale and mix it all together, adding a couple of tablespoons of the flour/almond meal mix too. You should be able to make patties from this mix that hold together fairly well. If too wet, add more flour/almond meal; if too dry, drizzle in some olive oil or water. Form six burgers and coat each burger in the remaining flour/almond meal.

[4] Heat a couple of tablespoons of olive oil over medium heat in a non-stick frying pan. Cook each burger for 4 minutes on each side, adding more oil if need be. They will get a nice crunchy outside with a hot, tasty middle. Serve and enjoy.

outside - perfectly crisp. inside - chewy but not grainy, soft but not mushy.

outside – perfectly crisp. inside – chewy but not grainy, soft but not mushy.

These are great on a lightly toasted whole wheat bun with caramelized onions, or my favorite is on a fresh kaiser roll with onions as well as roasted red peppers and some baby greens mixed with a homemade goddess dressing. If you are not averse to dairy, try the goat cheese. I could go on and on but just try it – tasting is believing!

For a printable version of this recipe click here.

15 Comments

Filed under Gluten Free, Guest Blog, Main Dish, Recipes, Vegan, Vegetarian

SZECHUAN MIRACLE NOODLES

In yesterday’s post I introduced you to Shirataki Miracle Noodles.  The recipe in this post is one that I came up with and has been a regular in my kitchen since.  It is so quick and tasty. 

I need to address the fact that the Sriracha sauce in the recipe is not completely vegan.  There is some fish extract in the sauce (way down on the ingredient list).  While I eat a plant based diet and do not eat any animal flesh, I do on occasion consume sauces that have fish extracts in them.  I married into a Chinese family and have picked-up so many wonderful cooking tips from them.  They have also intriduced me to some really great marinades and sauces.  I feel that these sauces make up such a small percentage of my daily diet that I am personally OK with using the sauces in small amounts (i.e.this recipe only calls for 1/4 tsp. of Sriracha…of that 1/4 tsp, the fish extract is the 5th ingredient).

 *A reader wrote in to let me know that the Sriracha with the rooster IS vegan…that is so great to know.  The bottle of Sriracha in my fridge is a different brand and contains fish extract.
 

Image Courtesy of foodproof.com

Image Courtesy of foodproof.com

INGREDIENTS

1 package angel hair Miracle Noodles

¼ of an onion, sliced into matchsticks (I used a red onion)

½ cup dried mushrooms, reconstituted (I bought mine at Costco)

½ – 1 tsp. Sriracha sauce (I like it HOT)

5 basil leaves, cut into thin strips

scarce amount of olive oil

soy sauce to taste

dash of sesame oil (optional)

 ~

Pour hot water over the dried mushrooms.  Once reconstituted, slice to desired size.

Rinse the noodles in a colander and drain. 

Pour a very slight amount of olive oil into a pan and sauté the onions. 

Once the onions are translucent and slightly browned, add in the Miracle Noodles.  Toss to incorporate and then add the Sriracha sauce and soy sauce.  Mix well.

Finally, add the mushrooms and basil and toss to incorporate.

That’s it!  Pour the noodles into a bowl and enjoy…

For a printable version of this recipe click here.

7 Comments

Filed under Gluten Free, Main Dish, Recipes, Vegan, Vegetarian

HEARTY VEGGIE LASAGNA

Hearty Veggie Lasagna

Hearty Veggie Lasagna

Whenever I cook lasagna I make a HUGE one and I tend to do it on a weekend or an afternoon when I know I will be home for the rest of the night.  If you are going to go to the trouble to make lasagna, why not have it be big enough to last for a few meals?  When I make this lasagna it lasts my family of 4 (2 of which are children) 3 whole dinners!  We eat it fresh out of the oven one night and then I usually freeze the other 2 sections for 2 other nights.  You pop it in the oven for an hour from the freezer, make a salad, and you have a fantastic dinner!

***NOTE***

I just cooked one of my frozen lasagna sections and IT DOES NOT REHEAT WELL when using gluten free lasagna noodles (they turned to mush).  The lasagna tastes AWESOME the first night and when reheated as left-overs, but unfortunately I can NOT recommend reheating it from the freezer.  Bummer. 

The next time I make this lasagna I am going to cut the recipe in 1/2.

There are a few keys to making great tasting vegan lasagna:

  1. All of the components need to taste good enough to eat on their own
  2. The sauce needs to be very fresh and flavorful
  3. The cheese filling needs to have the taste and texture everyone has come to expect

As for the cheese, it has taken a lot of experimenting, but I have finally come-up with what I call my Vegan Herbed Ricotta.  I am not a big fan of using very much soy in general (A LOT of the recipes you will see for vegan lasagna rely on tofu tremendously), so through trial and error I have come up with a recipe that only uses ½ a brick of extra firm sprouted tofu and the rest of the cheese is comprised of beans, vegan goat cheese, and herbs and spices.  When you think about it, ½ a brick of tofu spread out over three dinners for four people is very nominal.

While it is a time investment to make lasagna, the end result is so very worth it and will pay off when you realize you have made 3 meals!

~

INGREDIENTS

2 packages brown rice lasagna noodles

2 25.5 oz. jars of tomato basil pasta sauce

4 10 oz. bags baby bella mushrooms

2 medium onions

4 small or 2 large zucchini

1 tsp. olive oil

Simply Organic garlic salt to taste

1 package Daiya mozzarella cheese

VEGAN HERBED RICOTTA

1 cup vegan goat cheese*

½ package extra firm sprouted tofu by Wildwood, drained and crumbled

15 oz. can great northern beans, drained and rinsed

2 10 oz. packages Cascadian Farms frozen spinach, thawed and squeezed dry

1 packed cup fresh basil

4 garlic cloves

1 tsp oregano

1 tsp salt

pepper to taste

* click here for recipe 

~

Preheat the oven to 400°

Place a strainer over a bowl and pour one of the jars of pasta sauce into the strainer.  You want most of the liquid to strain into the bowl.  You may need to stir the sauce a few times to help release most of the liquid.

Strain 1 Jar of Sauce

Strain 1 Jar of Sauce

While the pasta sauce is straining, cook the lasagna noodles according to the instructions on the box.  I am always leery about noodles that claim they do not need to be precooked, so I always precook them.  It really doesn’t add much time to the process since they will cook while you are preparing the other ingredients.

While the noodles are cooking, make the Vegan Herbed Ricotta.  Place the vegan goat cheese and sprouted tofu in a bowl.  In a food processor fitted with the S blade, pulse together the basil, garlic, oregano, salt, and pepper.  You will need to stop and scrape down the bowl of the processor a few times during the process. 

Basil and Garlic

Basil and Garlic

Oregano, Salt, and Pepper is Added

Oregano, Salt, and Pepper is Added

Once the mixture resembles pesto, add the great northern beans and pulse only a few times since you want the beans to maintain some texture.  Gently fold the mixture from the food processor into the vegan goat cheese and crumbled tofu. 

Add Beans and Pulse

Add Beans and Pulse

Combine with Tofu and Vegan Goat Cheese

Combine with Tofu and Vegan Goat Cheese

Once well combined, gently fold in the spinach (which you have squeezed ALL of the liquid out of so it forms a nice dry ball).

Defrosted Spinach

Defrosted Spinach

Liquid Squeezed Out

Liquid Squeezed Out

Gently Fold In Spinach

Gently Fold In Spinach

Completed Vegan Herbed Ricotta

Completed Vegan Herbed Ricotta

Now that the noodles are done cooking, rinse them under cool water.  Once rinsed, lay them out in a single layer to prevent sticking (I use sheet pans).

Without washing the food processor bowl (save yourself some time, there is no real need) place the mushrooms one bag at a time into the food processor and pulse until they are fairly well chopped, but maintain some texture.  Pour the mushrooms into a large pot.  Repeat with the other three bags until all of the mushrooms are chopped. 

Pre-Sliced Mushrooms into the Processor

Pre-Sliced Mushrooms into the Processor

Roughly chop the onions and place them into the unwashed food processor bowl.  Pulse until finely chopped and add the onions to the pot with the chopped mushrooms.

Onions and Mushrooms

Onions and Mushrooms

Turn the burner onto medium and cook the mushrooms and onions down.  Place the lid on the pot to speed-up the process.  Once the mushrooms and onions are cooked (approx. 10 minutes), pour them into a strainer to strain out all of the liquid.  Once strained, salt and pepper to taste.

Cooked Down Onions and Mushrooms

Cooked Down Onions and Mushrooms

Strain the Liquid Out and Season to Taste

Strain the Liquid Out and Season to Taste

Chop the zucchini into 1/8” wheels and sauté on medium heat with 1 tsp oil.  You want the zucchini to brown very slightly.  This should only take 3-4 minutes.  Flavor the zucchini with garlic salt to taste.

Saute the Zucchini

Saute the Zucchini

It is now time to assemble the lasagna.  Pour one third of the unopened pasta sauce (NOT the pasta sauce you are straining) into the bottom of a 10” x 12” deep casserole dish.  Follow with a layer of lasagna noodles, 1/3 of the Vegan Herbed Ricotta, 1/3 of the Daiya, and 1/3 of the mushrooms, and another 1/3 of the sauce.

1/3 Jar of Pasta Sauce

1/3 Jar of Pasta Sauce

Layer of Noodles

Layer of Noodles

1/3 of the Herbed Riccota

1/3 of the Herbed Riccota

1/3 Daiya, 1/3 Mushrooms, and Another 1/3 Sauce

1/3 Daiya, 1/3 Mushrooms, and Another 1/3 Sauce

Follow with another layer of noodles, 1/3 of the Vegan Herbed Ricotta, all of the zucchini wheels, most of the remaining mushrooms (reserve some for the top of the lasagna), most of the remaining Daiya (reserve some for the top of the lasagna), and the last 1/3 of the jar of pasta sauce.

Noodle Layer, Herbed Riccota, Zucchini

Noodle Layer, Herbed Riccota, Zucchini

Mushrooms and Daiya

Mushrooms and Daiya

Top with the last layer of lasagna noodles, the ENTIRE jar of the strained pasta sauce (reserve the liquid for an alternate use…you will not need it for this recipe…if you put it into the lasagna it will become soggy), any remaining mushrooms, and the remaining Daiya.

Last Layer of Noodles, Strained Pasta Sauce, and Remaining Mushrooms and Daiya

Last Layer of Noodles, Strained Pasta Sauce, and Remaining Mushrooms and Daiya

Cover the lasagna with a piece of foil that you have oiled on the inside so it won’t stick to it.

Cook the lasagna for 1 hour at 400°.


Hearty Veggie Lasagna

Hearty Veggie Lasagna

For a printable version of this recipe click here.

5 Comments

Filed under Cheese, Gluten Free, Main Dish, Recipes, Vegan, Vegetables, Vegetarian